If you have an on premise Active Directory and you’re trying to use Microsoft Office 365 or Azure services, you’ve probably already set up Azure Entra Connect (formerly Azure AD Connect, and sometimes called Azure Entra ID Connect) on one of your servers to sync your directory.
One of the strange things about Azure Entra Connect is that there is no sync now button which means if you are making a change to your Active Directory, so if don’t have time to wait for its scheduled sync, you need to run it manually. Fortunately, forcing an Azure Entra Connect sync is not difficult:
1 – Prework with Azure Entra Connect
There are a few small things you need to do before syncing and while they may be obvious to some, they are not obvious to all, so we list them:
- RDP to the server with Azure Entra Connect
- Open a PowerShell (or Windows Terminal) as an Admin
- Install the ADSync PowerShell Module
- If you don’t already have it installed, import it using this command:
Import-Module -Name "C:\Program Files\Microsoft Azure AD Sync\Bin\ADSync" -Verbose
- If you don’t already have it installed, import it using this command:
2 – Start a Sync
You have two choices when sync’ing Azure Entra Connect:
A – DELTA SYNC
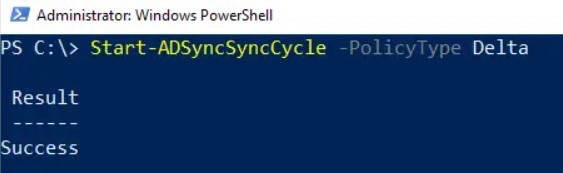
A delta sink copies any changes that have been made since the last sync and only those changes. This is almost certainly the one you want to use:
Start-ADSyncSyncCycle -PolicyType Delta
B – FULL SYNC
You can complete a full sync of your entire Active Directory (which will take time and is very likely unnecessary), using this command:
Start-ADSyncSyncCycle -PolicyType Initial
3 – Check Azure Entra Sync Status:
As you can see in the screenshots above the PowerShell command line will respond with SUCCESS, but that does not mean the sync has completed; it only means the sync has started.
To see if the sink has completed successfully you need to launch the synchronization service program as an administrator and then drill into it.
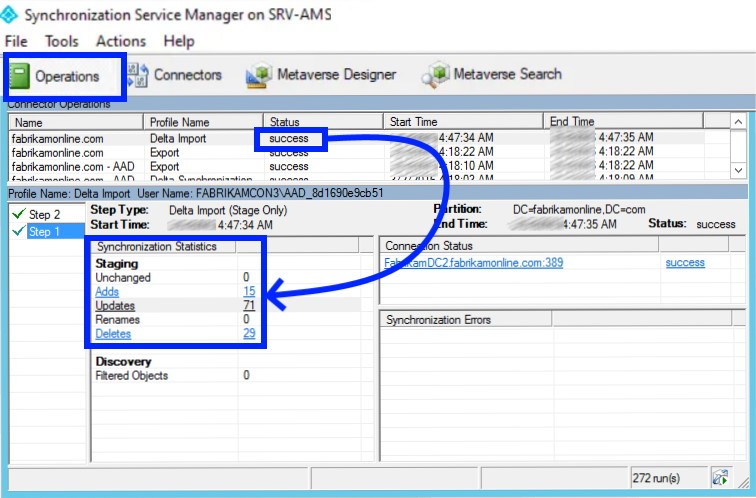
- Click START, type SYNCRON, right click on SYNCRONIZATION SERVICE and select RUN AS ADMINISTRATOR
- On the OPERATIONS tab notice that the top line likes shows something like YOUR DOMAIN – DELTA SYNCHRONIZATION – IN PROGRESS
- When it shows YOUR DOMAIN – DELTA SYNCHRONIZATION – SUCCESS, you can click on the entry and see how many changes were made
OTHER HANDY AZURE ENTRA SYNC COMMANDS
Here are some other completely self-explanatory AZURE ENTRA AD commands, you might find handy:
Stop Azure Entra Sync From Syncing On Schedule
Set-ADSyncScheduler -SyncCycleEnabled $false
Start Azure Entra Sync Schedule
Set-ADSyncScheduler -SyncCycleEnabled $true
Set the Azure Entra Sync Schedule
Set-ADSyncScheduler -CustomizedSyncCycleInterval d.HH:mm:ss
So if you want Azure and your on-premise domain to sync every 45 minutes, use this command
Set-ADSyncScheduler -CustomizedSyncCycleInterval 00:45:00
Note that the Azure Entra Connect Sync:
- has a minimum allowed synchronization interval of 30 minutes
- needs to be run a minimum of once per 7 days


0 Comments